Android GridView shows items in two-dimensional
scrolling grid (rows & columns) and the grid items are not
necessarily predetermined but they automatically inserted to the layout
using a ListAdapter

Grid view
An adapter actually bridges between UI components and
the data source that fill data into UI Component. Adapter can be used to
supply the data to like spinner, list view, grid view etc.
The
ListView and
GridView are subclasses of
AdapterView and they can be populated by binding them to an
Adapter, which retrieves data from an external source and creates a View that represents each data entry.
GridView Attributes
Following are the important attributes specific to GridView −
| Attribute |
Description |
| android:id |
This is the ID which uniquely identifies the layout. |
| android:columnWidth |
This specifies the fixed width for each column. This could be in px, dp, sp, in, or mm. |
| android:gravity |
Specifies the gravity within each cell. Possible values are top,
bottom, left, right, center, center_vertical, center_horizontal etc. |
| android:horizontalSpacing |
Defines the default horizontal spacing between columns. This could be in px, dp, sp, in, or mm. |
| android:numColumns |
Defines how many columns to show. May be an integer value, such as
"100" or auto_fit which means display as many columns as possible to
fill the available space. |
| android:stretchMode |
Defines how columns should stretch to fill the available empty space, if any. This must be either of the values −
- none: Stretching is disabled.
- spacingWidth: The spacing between each column is stretched.
- columnWidth: Each column is stretched equally.
- spacingWidthUniform: The spacing between each column is uniformly stretched..
|
| android:verticalSpacing |
Defines the default vertical spacing between rows. This could be in px, dp, sp, in, or mm. |
Example
This example will take you through simple steps to show how to create
your own Android application using GridView. Follow the following steps
to modify the Android application we created in
Hello World Example chapter −
| Step |
Description |
| 1 |
You will use Android studio IDE to create an Android application and name it as HelloWorld under a package com.example.helloworld as explained in the Hello World Example chapter. |
| 2 |
Modify the detault content of res/layout/activity_main.xml file to include GridView content with the self explanatory attributes. |
| 3 |
No need to change string.xml, Android studio takes care of defaults strings which are placed at string.xml |
| 4 | Let's put few pictures in res/drawable-hdpi folder. I have put sample0.jpg, sample1.jpg, sample2.jpg, sample3.jpg, sample4.jpg, sample5.jpg, sample6.jpg and sample7.jpg. |
| 5 |
Create a new class called ImageAdapter under a package
com.example.helloworld that extends BaseAdapter. This class will
implement functionality of an adapter to be used to fill the view. |
| 6 |
Run the application to launch Android emulator and verify the result of the changes done in the application. |
Following is the content of the modified main activity file
src/com.example.helloworld/MainActivity.java. This file can include each of the fundamental lifecycle methods.
package com.example.helloworld;

import android.os.Bundle;
import android.app.Activity;
import android.view.Menu;
import android.widget.GridView;

public class MainActivity extends Activity {
   @Override
   protected void onCreate(Bundle savedInstanceState) {
      super.onCreate(savedInstanceState);
      setContentView(R.layout.activity_main);

      GridView gridview = (GridView) findViewById(R.id.gridview);
      gridview.setAdapter(new ImageAdapter(this));
   }

   @Override
   public boolean onCreateOptionsMenu(Menu menu) {
      getMenuInflater().inflate(R.menu.main, menu);
      return true;
   }
}
Following will be the content of
res/layout/activity_main.xml file −
<?xml version="1.0" encoding="utf-8"?>
<GridView xmlns:android="http://schemas.android.com/apk/res/android"
   android:id="@+id/gridview"
   android:layout_width="fill_parent"
   android:layout_height="fill_parent"
   android:columnWidth="90dp"
   android:numColumns="auto_fit"
   android:verticalSpacing="10dp"
   android:horizontalSpacing="10dp"
   android:stretchMode="columnWidth"
   android:gravity="center"
/>
Following will be the content of
res/values/strings.xml to define two new constants −
<?xml version="1.0" encoding="utf-8"?>
<resources>
   <string name="app_name">HelloWorld</string>
   <string name="action_settings">Settings</string>
</resources>
Following will be the content of
src/com.example.helloworld/ImageAdapter.java file −
package com.example.helloworld;

import android.content.Context;
import android.view.View;
import android.view.ViewGroup;
import android.widget.BaseAdapter;
import android.widget.GridView;
import android.widget.ImageView;

public class ImageAdapter extends BaseAdapter {
   private Context mContext;

   // Constructor
   public ImageAdapter(Context c) {
      mContext = c;
   }

   public int getCount() {
      return mThumbIds.length;
   }

   public Object getItem(int position) {
      return null;
   }

   public long getItemId(int position) {
      return 0;
   }

   // create a new ImageView for each item referenced by the Adapter
   public View getView(int position, View convertView, ViewGroup parent) {
      ImageView imageView;

      if (convertView == null) {
         imageView = new ImageView(mContext);
         imageView.setLayoutParams(new GridView.LayoutParams(85, 85));
         imageView.setScaleType(ImageView.ScaleType.CENTER_CROP);
         imageView.setPadding(8, 8, 8, 8);
      }
      else
      {
         imageView = (ImageView) convertView;
      }
      imageView.setImageResource(mThumbIds[position]);
      return imageView;
   }

   // Keep all Images in array
   public Integer[] mThumbIds = {
      R.drawable.sample_2, R.drawable.sample_3,
      R.drawable.sample_4, R.drawable.sample_5,
      R.drawable.sample_6, R.drawable.sample_7,
      R.drawable.sample_0, R.drawable.sample_1,
      R.drawable.sample_2, R.drawable.sample_3,
      R.drawable.sample_4, R.drawable.sample_5,
      R.drawable.sample_6, R.drawable.sample_7,
      R.drawable.sample_0, R.drawable.sample_1,
      R.drawable.sample_2, R.drawable.sample_3,
      R.drawable.sample_4, R.drawable.sample_5,
      R.drawable.sample_6, R.drawable.sample_7
   };
}
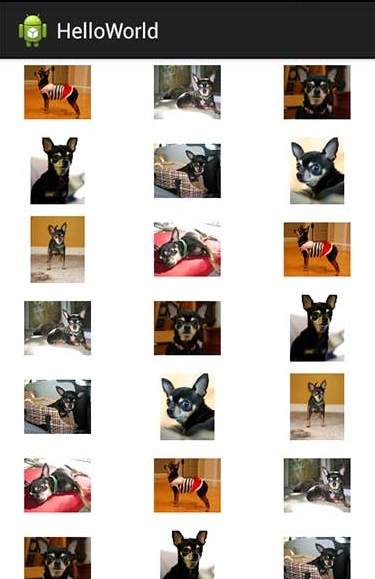
Let's try to run our modified
Hello World! application we just modified. I assume you had created your
AVD while doing environment setup. To run the app from Android Studio, open one of your project's activity files and click Run

icon from the toolbar. Android studio installs the app on your AVD and
starts it and if everything is fine with your setup and application, it
will display following Emulator window −
Sub-Activity Example
Let's extend the functionality of above example where we will show
selected grid image in full screen. To achieve this we need to introduce
a new activity. Just keep in mind for any activity we need perform all
the steps like we have to implement an activity class, define that
activity in AndroidManifest.xml file, define related layout and finally
link that sub-activity with the main activity by it in the main
activity class. So let's follow the steps to modify above example −
| Step |
Description |
| 1 |
You will use Android studio IDE to create an Android application and name it as HelloWorld under a package com.example.helloworld as explained in the Hello World Example chapter. |
| 2 |
Create a new Activity class as SingleViewActivity.java under a package com.example.helloworld as shown below. |
| 3 |
Create new layout file for the new activity under res/layout/ folder. Let's name this XML file as single_view.xml. |
| 4 |
Define your new activity in AndroidManifest.xml file using <activity.../> tag. An application can have one or more activities without any restrictions. |
| 5 | Run the application to launch Android emulator and verify the result of the changes done in the application. |
Following is the content of the modified main activity file
src/com.example.helloworld/MainActivity.java. This file can include each of the fundamental life cycle methods.
package com.example.helloworld;

import android.app.Activity;
import android.content.Intent;
import android.os.Bundle;
import android.view.Menu;
import android.view.View;
import android.widget.AdapterView;
import android.widget.AdapterView.OnItemClickListener;
import android.widget.GridView;

public class MainActivity extends Activity {
   @Override
   protected void onCreate(Bundle savedInstanceState) {
      super.onCreate(savedInstanceState);
      setContentView(R.layout.activity_main);

      GridView gridview = (GridView) findViewById(R.id.gridview);
      gridview.setAdapter(new ImageAdapter(this));

      gridview.setOnItemClickListener(new OnItemClickListener() {
         public void onItemClick(AdapterView<?> parent, View v, int position, long id){
            // Send intent to SingleViewActivity
            Intent i = new Intent(getApplicationContext(), SingleViewActivity.class);

            // Pass image index
            i.putExtra("id", position);
            startActivity(i);
         }
      });
   }

   @Override
   public boolean onCreateOptionsMenu(Menu menu) {
      getMenuInflater().inflate(R.menu.main, menu);
      return true;
   }
}
Following will be the content of new activity file
src/com.example.helloworld/SingleViewActivity.java file −
package com.example.helloworld;

import android.app.Activity;
import android.content.Intent;
import android.os.Bundle;
import android.widget.ImageView;

public class SingleViewActivity extends Activity {
   @Override
   public void onCreate(Bundle savedInstanceState) {
      super.onCreate(savedInstanceState);
      setContentView(R.layout.single_view);

      // Get intent data
      Intent i = getIntent();

      // Selected image id
      int position = i.getExtras().getInt("id");
      ImageAdapter imageAdapter = new ImageAdapter(this);

      ImageView imageView = (ImageView) findViewById(R.id.SingleView);
      imageView.setImageResource(imageAdapter.mThumbIds[position]);
   }
}
Following will be the content of
res/layout/single_view.xml file −
<?xml version="1.0" encoding="utf-8"?>
<LinearLayout xmlns:android="http://schemas.android.com/apk/res/android"
   android:layout_width="match_parent"
   android:layout_height="match_parent"
   android:orientation="vertical" >

<ImageView android:id="@+id/SingleView"
   android:layout_width="fill_parent"
   android:layout_height="fill_parent"/>

</LinearLayout>
Following will be the content of
AndroidManifest.xml to define two new constants −
<?xml version="1.0" encoding="utf-8"?>
<manifest xmlns:android="http://schemas.android.com/apk/res/android"
   package="com.example.helloworld"
   android:versionCode="1"
   android:versionName="1.0" >

   <uses-sdk
      android:minSdkVersion="8"
      android:targetSdkVersion="22" />

   <application
      android:allowBackup="true"
      android:icon="@drawable/ic_launcher"
      android:label="@string/app_name"
      android:theme="@style/AppTheme" >

      <activity
         android:name="com.example.helloworld.MainActivity"
         android:label="@string/app_name" >

         <intent-filter>
            <action android:name="android.intent.action.MAIN" />
            <category android:name="android.intent.category.LAUNCHER" />
         </intent-filter>

      </activity>

      <activity android:name=".SingleViewActivity"></activity>

   </application>
</manifest>
Let's try to run our modified
Hello World! application we just modified. I assume you had created your
AVD while doing environment setup. To run the app from Android studio, open one of your project's activity files and click Run
icon from the toolbar. Android studio installs the app on your AVD and
starts it and if everything is fine with your setup and application, it
will display following Emulator window −

Now if you click on either of the images it will be displayed as a single image, for example−
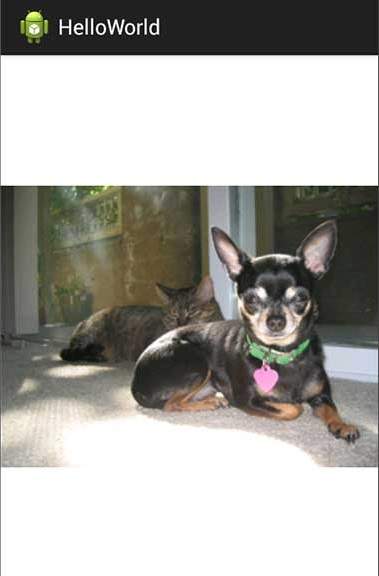
Kindly note above mentioned images have been taken from Android official website.

Start incognito chat
.
.


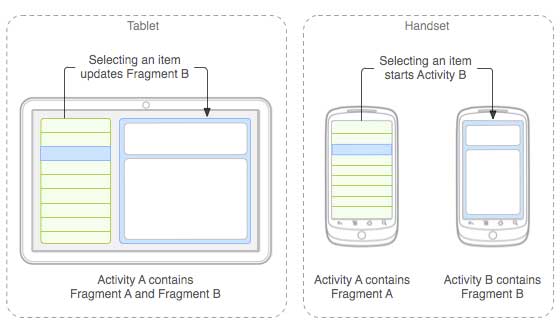 The application can embed two fragments in Activity A, when running
on a tablet-sized device. However, on a handset-sized screen, there's
not enough room for both fragments, so Activity A includes only the
fragment for the list of articles, and when the user selects an article,
it starts Activity B, which includes the second fragment to read the
article.
The application can embed two fragments in Activity A, when running
on a tablet-sized device. However, on a handset-sized screen, there's
not enough room for both fragments, so Activity A includes only the
fragment for the list of articles, and when the user selects an article,
it starts Activity B, which includes the second fragment to read the
article.


 icon from the toolbar. Android Studio installs the app on your AVD and
starts it and if everything is fine with your setup and application, it
will display following Emulator window −
icon from the toolbar. Android Studio installs the app on your AVD and
starts it and if everything is fine with your setup and application, it
will display following Emulator window − Now you try to click on two buttons, one by one and you will see that font of the Hello World text will change, which happens because registered click event handler method is being called against each click event.